Stellar Sprightlys, or is it Sprightly Stellars?
February 28 at 12am | Posted in Life, Little Comet Tails, Molly, Sewing | 9 CommentsWell, whatever it is, it’s Molly ASKING to go on the potty!
That’s right 😉 our 23 month old started asking to go on the potty herself about a month ago (when she was 22 months, lol). A neighbor of mine asked if we could have a sewing session and we made up some training pants for her son using the Sprightly Soaker & Underwear Pattern and the free add-on.


I WAS totally set to sew Molly up some cloth diapers using the Little Half Moon pattern for outings (I even cut them all out), but she had her own ideas! Molly started asking to go on the potty out of nowhere and wanting to wear Thomas’ underwear. She needed her own and fast! Never being able to leave well enough alone, I decided to make her some Stellar Transitions
but I wanted to make them without waterproofness and without FOE.
I grabbed my Sprightly Soaker and Underwear pattern and used the bands for the size medium using the same length, but cutting the width down to about 4″ for the waist and about 3″ for the legbands (She’s tiny, lol… She’s in 18-24 month ST).

They fit PERFECT! I have since made her 5 more pairs of Sprightly Underwear with the extra layer, and she is doing great! I foresee some regular Sprightly Underwear in her very near future! Note to self: must get cracking on child #3 so I can keep on sewing cloth diapers! Totally kidding, of course, I think… lol!
Little One Size Pocket Diaper Tutorial
February 17 at 7pm | Posted in Freebies, Little Comet Tails, Sewing | 14 CommentsMy ever lovely licensee Jessica from Utopian Dreams is an expert Little One Size
maker, and she was so kind to write up this tutorial on how she makes the cloth diaper pattern into a pocket diaper. She’s very clever in her snap pocket, I admire her ingenuity 😉 Go try it!
-Samantha
——————-
With this being the first in-depth tutorial I have written, I tried to be as detailed as possible but if you have any questions don’t be afraid to ask. This was done with the side snapping version, but is pretty easily translated over to the front snapping.
1. Gather your supplies. I did also use a hole punch that wasn’t pictured.

2. Mark your pattern. You can decide if you want them on your master pattern or if you want to trace a new one specifically for pockets. Personally, I am lazy and put it on my master pattern. You can determine how much of an overlap you prefer for you sham openings. The way this is written there is an inch overlap initially but it gets decreased down to about 3/4″ when the hemming is complete.
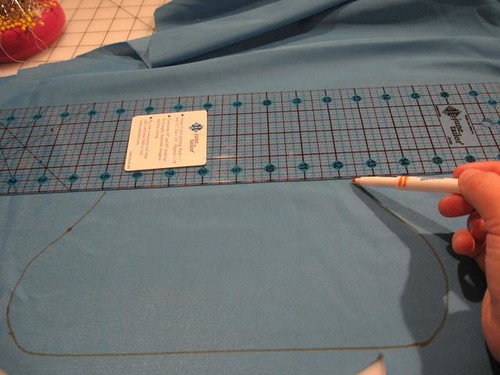
Lay your pattern down and measure 5″ from the front panel. Make a dot at each corner of the ruler.

Turn your ruler sideways and draw a line through those two points. (You have got to love algebra coming into play in diaper making!)

Lay your pattern down and measure 4″ from the front panel. Make a dot at each corner. Repeat the line process.

Now, I often sew way too late or way too early and get confused easily. Therefore, I label my lines with which correlates to the back versus the front. It saves a lot of swearing in the long run!

3. Making a pattern piece. You need a special pattern piece for the rise snaps of the pocket. This pattern piece will serve two purposes: It will make something for you to trace and apply rise snaps too and it will also help with placement of that piece on your inner.
Measure the distance between the rise snaps (shhh it is 2.5″)
Knowing this, cut a piece of paper or poster board to 2″ x 4″ in order to provide enough room to comfortably sew around. Now, you need to find the center point of the piece. Two lines will take care of that!


Next, measure 1.25″ out from that center point in each direction and make a mark. (Don’t worry, you cannot measure the wrong way because the other direction is only an inch wide from the center!) Punch holes through those markings.
Place the pattern piece on top of your full pattern and bask in amazement at the accuracy of your measurements! Wow, you are awesome!!

4. Time to put your new pattern piece to work! Now, since this piece will be on the inside of your pocket. You can use pretty much whatever material you see fit. I used the same suedecloth as the inner but even absorbent material would work!
Trace the pattern piece and cut out two layers of fabric. Leave a bit around the outside of the traced line.

Apply one socket and one stud on the snap placement markings.

Take it to the machine and sew ON the line that you traced

Trim the excess fabric to even up your seam allowance.

OK, set this piece aside for now.
5. Inner cutting time! Trace around your pattern on the wrong side of your fabric and stop your tracing lines when they are at the appropriate “pocket” line on your pattern. (side note: remember which line is which or you will wind up with pattern pieces that don’t overlap) Also, make sure to mark the snap placement for the rise snaps as well. Feel free to leave off the soaker snap placement though…you will not be using them.
Use your wonderful algebraic skills to draw a line between these two points.

Repeat for the front panel piece as well.
6. Placing the rise snaps! OK, at this point you have what looks like standard inner layers for a sham pocket diaper and a funky little piece of fabric with two snaps attached. Those snaps need to be part of this diaper!
Pull out your little pattern piece and place it over the markings on the wrong side of your inner. Once you have the piece lined up so that you can see the markings through the holes, trace around it.

This will leave you with a layer that looks like this:

Pin your snapped piece with cap sides down to the WRONG side of the inner (If you pin it to the right side… you will kick yourself later).

Sew around the piece on the same line as before (I change my bobbin thread to coordinate with the inner, but that is not necessary).

Flip the inner over and look at the right side! YAY! Just a 2″x4″ square and no snaps against the baby!

7. Hemming and assembly! I do not hem the part of the inner that will be hidden when the diaper is complete. I find that by leaving it without a hem it cuts down on bulk, strain on the machine and it lays flatter to boot. If you are using a fabric that will fray, you will want to at least serge the bottom of that piece. For the front panel piece you will need a hem.
Measure 1/4″ from the bottom of the piece and mark two dots.

Draw a line at that 1/4″ level.

Fold the fabric along that line and pin with wrong sides facing each other. (Yes, for those of you who know me, I am now a reformed pinner. LOL)

Sew hem down. I again left the bobbin thread the color as the inner.

Grab your outer fabric and place the front panel piece right sides together on top of it.

Lay the back panel piece right side down on top of both of your other layers.

Pin everything together.

Sew All the way around. Remember, you don’t have to leave an opening because you can turn through the pocket! Seriously, that is my favorite part! Apply the elastic, topstitching, snaps, etc. according to the t&t version of the pattern.
8. YOU ARE DONE! You now have a one sized pocket diaper. The weight and size range will vary a bit depending on what type of fabrics you used, but it is nice to have the ease of use of a pocket combined with the convenience of a one sized diaper!
The rise is so simple to adjust. You can either do it with the diaper right side out simply by feeling around and snapping the snaps together, or you can turn it inside out and snap them together that way.


**Disclaimer: designs used on this diaper were hand digitized for personal use only by a member of a message board I frequent. This diaper was a shower gift for a friend and was not sold for profit!**
Now, get out there and make some LOS pocket diapers! You know you want to 😉
Flickr


Blog at WordPress.com.
Entries and comments feeds.
