Look Ma, I’m Famous!
June 2 at 6am | Posted in Freebies, Life, Little Comet Tails, Sewing | 2 CommentsWell, sorta. If “famous” means having your passions featured in two different blogs that you idolize in less than a week, then YES!!
On Saturday, my cloudscape photo of Thomas and Molly won the tap tap tap contest.

I was completely floored that they also chose another photo entry of mine in the honourable mentions. If you have an iPhone, I totally recommend Camera+ it’s a great app (and I’m not just saying that because I won, lol).
Today, I’m guest blogging over at Sew Mama Sew! Can you just pinch me now? I submitted an idea for a Summer Sewing series and they liked it, they really liked it! I hope you all do too. It’s for a freebie swim diaper pattern!! You can find their intro about me here (I’m so flattered by their kind words), and the Aquarius Swimmer Pattern is available as a PDF download on their blog.

While you’re at it, head over to Sew Mama Sew! and look around, it’s one of my favorite sites (and I’m not just saying that because I’m a Summer Sewing contributor, lol)!
A knit Spin Around Dress with Sleeves!! (pattern add on included)
October 13 at 5pm | Posted in Freebies, Molly, Sewing | 2 CommentsSo, if you know me, you know I can never leave well enough alone. Which is why yesterday I thought, hmm I wonder if it would work as a knit and I could totally make sleeves to go with it for the cold weather months ahead. 🙂
Well, that should be easy, right? All I needed to do was cut the two back pieces on a fold where the first line is (totally thinking ahead when I made the pattern) before the part with the snaps in it. Knit part complete! Oh and here’s my sleeve pattern add on while I’m at it:
**** FOR KNITS**** http://www.kingstondesign.com/SpinAroundSleeveAddon.pdf
***FOR WOVENS*** http://www.kingstondesign.com/WovenSpinAroundSleeveAddon.pdf
Here’s some quick modifications, with kinda bad pics, sorry I used my iphone.
After you sew the shoulder seams, the neckhole should look like this:

Pin and sew!

Clip V’s or pink and turn right side out, topstitch.

Match center to seam of top, right sides together. Pin.

Sew/Serge together. Repeat for other sleeve. (see? I was ambitious, I even got out my serger this time!)

Looking like something!

Pin bottom of front piece and top of bottom piece right sides together, sew and then topstitch. Repeat for back and bottom.
Match up front to back along sleeves and down side seams. Pin together, sew down both sides. (Pretend I took a picture of this step.)

Fold up your sleeve hem. I did 1-1/4″ for Molly, I would probably do 1″ for a standard 2T. Topstitch up 😉 (I did 1″ from edge, 5/8″ for standard 2T)

Hem the bottom of the dress! I serged this time, then folded up 1″ and topstitched 5/8″ from bottom edge. (Feel free to do it like the original post as well.)

Done. On with your day then.
“It Spin Around?” A Molly Size Freebie Dress Pattern.
October 12 at 8am | Posted in Freebies, Little Comet Tails, Molly | 23 Comments
Whenever I come up with a new dress pattern for Molly, she always asks, “It Spin Around?” In this pattern, she is all princess and all spin. The Spin Around Dress, made just for Molly, and she’s not shy about sharing.
This Pattern is for PERSONAL USE ONLY. Please do not reproduce or sell items made from this pattern.
Quicky instructions and full size pattern pieces available in pdf form for downloading here:
http://www.kingstondesign.com/SpinAroundDressFreebie.pdf
Materials:
- A yard and a half of any woven of your choosing. I picked a lovely quilters cotton for mine. A good key to selecting a fabric is to remember that the lighter the weight the more the flowyness. If you pick a cordoury (which you could) expect it to be much less drapey and a bit more tenty 😉
- About a 50″x7″ strip coordinating/contrasting material to make a sash. If you are not folding it in half (ie: ribbon) then you only need it to be about 3-4″ tall. Totally optional, totally cute.
- Snaps. I like to use metal snaps on my dresses. You can get them at just about any craft store with a “snap setter” or get all fancy and order them online from somewhere like The Snap Store. I have the #16 size because that’s what the cool designs are in, but you can pick whatever size you think you’ll use most.
- Thread, match fiber content to your fabric as best you can.
Instructions:

Print out the .pdf of the pattern, being sure to turn all print scaling off and checking that your 1″ square is actually a 1″ square when you are all printed up nice. Read the labeling on the pattern, using the diagram to match it all together, see that you but the edges and tape together the bottom piece and NOT OVERLAP. 🙂

Cut out your pattern pieces. Lay out onto fabric and cut away.

When it’s all cut out, it should look something like this 🙂 I cut the sash fabric too.

Match up right sides together fronts to backs pinning at the shoulders.

Sew all four using 1/2″ seam allowance.

Match your newly formed “top” pieces right sides together, pinning along inner neckline and armholes.

Sew with your 1/2″ seam allowance, making sure you follow the sweetheart neckline and cut v’s or use pinking shears close to your stitches so that when you turn it lays nice.

Turn right side out, pin and topstitch 1/8″ from the edge the inner neckline from back snap panel to back snap panel.

Line up the armholes to make um, well arm “holes”.

Match right sides together and pin.

Repeat for both sides and sew them!

Fold right side out and topstitch 1/8″ in all the way around for both arms.

You’re halfway there! Set aside your FINISHED top piece and grab your two bottom pieces.

Pin side seams of the bottom pieces right sides together (of course!) and sew. I did a little zig zag down the edge of the seam on this one since it’s exposed on the inside. If you have a serger (and aren’t too lazy to take the cover off and use it, lol) then by all means serge this one 😉

Grab your top piece and pin it to the bottom piece. I pinned together the back pieces so that they overlapped about 5/8″ or so. Pin your front and side seams then line it all up in the back, it’s much easier that way.

Sew together and then topstitch it facing the inner seam down. (Have you figured out that I love topstitching by now?)

Almost done! Hemming time!

Fold and pin bottom edge up 1″ all the way around.

Fold down 1/4″ hiding the unfinished edge neatly inside, repinning as you go along.

Sew inside all the way around 1/8″ from your “top” edge.

Mark your snap placement on the back of the dress.

Pick out your pretty snaps and apply.

Make your sash. I just sewed all the way around on three sides folding the fabric in half leaving a hole for turning then topstitched all the way around. Then I tacked it on by hand to the dress at the side seams 1/2″ down from the armhole opening.

Put dress on model and initiate spinning!
How to Sew Little Half Moon All In Ones with Cute Cotton Outer Prints
August 15 at 4pm | Posted in Freebies, Little Comet Tails, Sewing | 20 Comments(Whew! That’s a wordy title!)
All In Ones (AIO) are great for outings or when you’re showing off your cloth diaper collection to your friends in hopes to convert them. PUL is great but only comes in a limited array of solid colors and Cotton Laminated PUL is adorable, but the prints you love are hard to come by and wicks anyway.
So what is a girl to do?
If you have the Little Half Moon Pattern, the answer is easy: Combine your favorite cotton woven (heck, it could even be a great skirt that you found at a vintage shop) and make a wick-less all in one. 😉 Start out with your pattern laid out on your favorite work surface.

See the two lines on the pattern for each diaper? One is designed for the Inner Fabric (the dotted line) and the other for the Outer Fabric (marked with the dotted to solid lines). When making a traditional AIO, you would cut 1 layer of PUL using the Outer Fabric line and 2 layers of your absorbent fabric on the Inner Fabric line.

To make one with a wick-less cute cotton outer, just cut one more layer on the Inner Fabric line, using your outer print.

From here it’s easy, all you need to do is fold under the non-matching edges of your print (basically the leg line) about 1/8 of an inch.

Lay the cotton layer on top of the right side of the PUL layer (shiny side down) and pin the cotton layer to the PUL.

Using a straight stitch, sew the two layers together, put aside.

Now it’s time to decide if you want a hidden inner soaker layer (to make a true AIO) or have a removable quick dry snap in soaker (technically making it an AI2). I have a serger, which makes snap in soaker construction a breeze, but if you don’t it’s totally fine to just turn and topstitch (t&t) or just don’t finish the edges and sew them on the inside to the hidden inner layer.

If you choose to sew up a snap in soaker, my free download works great for this. Before serging or t&t, add snaps to the bottom layer of the soaker and the top layer of the inner fabric. Be sure to use a scrap piece to stabilize. If you are choosing to t&t the whole diaper, now is also the time to apply snaps (or loop, of the hook and loop variety) to the wings. Stack the diaper layers as follows, hidden inner layer, then the inner layer right side up, and the outer layer right side down on top of that (with the cool cotton woven sewn on top of it).

Pin edges together. It is helpful to pin the front and back of the diaper first, then match the leg edges up. The outer layer will be “baggy”. This is correct and will all come together nicely when you turn it later and create a nice rolled in appearance.
Here’s where you get some choices:

I decided to leave these open along the back for ease of turning and applying snaps with the intention to serge them closed later, but I’ll include instructions for both. 😉

You can opt to make a traditional t&t diaper and sew a straight stitch ¼ inch seam allowance around the entire diaper leaving a 3-4 inch opening on the underside of one wing.

Now it’s elastic time! I used 1/4” polybraid for these. You can opt whether or not to use front elastic (I didn’t). The diaper has a larger size range without, however some babies are harder to fit and need this for leak minimization. Lay the elastic in the seam allowance even to the starting elastic marking and 3-step zigzag in the seam allowance across the top using the smallest stitch length and a medium width. Then, increase to the largest stitch length 3-step zigzag, sew to the end, and then decrease to the smallest stitch length and stop stretching as you sew back and forth a couple times to stabilize it.

Repeat for sides and back (if sewing completely t&t, if not just the sides).

Turn it all right side out. I like to use my bone folder to help smooth the corners and curves. Pin around the diaper as needed to help it lay flat, usually around the elastic points and any curves on the diaper.

Topstitch the front of the diaper and then the sides of the wings.

If you are serging the back closed and haven’t yet applied the snaps (or the loop) to the wings, if you want them hidden, now’s the time to do it!

Pin the layers together where the elastic starting and ending points are for the back elastic level to the top of the snaps.

Thread the elastic under the two pins inside the inner and outer layer at the starting marking in the back and 3-step zigzag across the top using the smallest stitch length and a medium width. Then, increase to the largest stitch length 3-step zigzag, sew along to the end pin stretching to the max as you sew, and then decrease to the smallest stitch length and stop stretching as you sew back and forth a couple times to stabilize it.

Make sure you caught all the elastic by checking the inside.

Serge the back closed if half serging or fold the opening closed by turning the edges in following the sewing line and pinning it shut.

Apply front snaps (or hook and loop) and lean them up against your snap press and act like paparazzi.
Little One Size Pocket Diaper Tutorial
February 17 at 7pm | Posted in Freebies, Little Comet Tails, Sewing | 14 CommentsMy ever lovely licensee Jessica from Utopian Dreams is an expert Little One Size
maker, and she was so kind to write up this tutorial on how she makes the cloth diaper pattern into a pocket diaper. She’s very clever in her snap pocket, I admire her ingenuity 😉 Go try it!
-Samantha
——————-
With this being the first in-depth tutorial I have written, I tried to be as detailed as possible but if you have any questions don’t be afraid to ask. This was done with the side snapping version, but is pretty easily translated over to the front snapping.
1. Gather your supplies. I did also use a hole punch that wasn’t pictured.

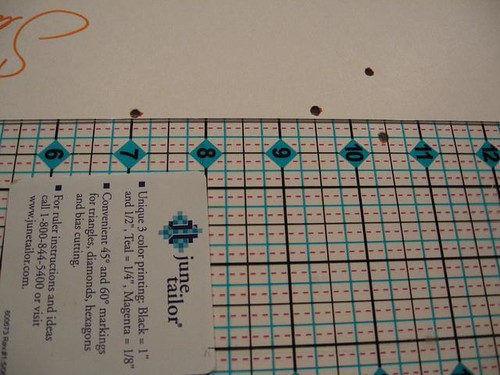
2. Mark your pattern. You can decide if you want them on your master pattern or if you want to trace a new one specifically for pockets. Personally, I am lazy and put it on my master pattern. You can determine how much of an overlap you prefer for you sham openings. The way this is written there is an inch overlap initially but it gets decreased down to about 3/4″ when the hemming is complete.
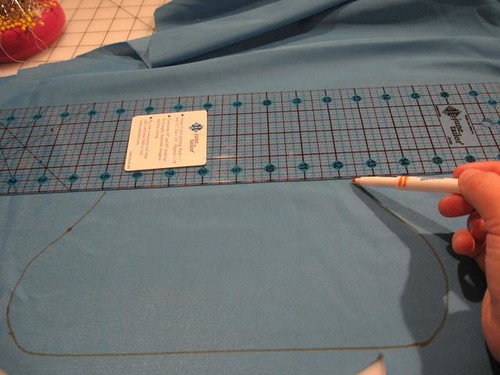
Lay your pattern down and measure 5″ from the front panel. Make a dot at each corner of the ruler.

Turn your ruler sideways and draw a line through those two points. (You have got to love algebra coming into play in diaper making!)

Lay your pattern down and measure 4″ from the front panel. Make a dot at each corner. Repeat the line process.

Now, I often sew way too late or way too early and get confused easily. Therefore, I label my lines with which correlates to the back versus the front. It saves a lot of swearing in the long run!

3. Making a pattern piece. You need a special pattern piece for the rise snaps of the pocket. This pattern piece will serve two purposes: It will make something for you to trace and apply rise snaps too and it will also help with placement of that piece on your inner.
Measure the distance between the rise snaps (shhh it is 2.5″)
Knowing this, cut a piece of paper or poster board to 2″ x 4″ in order to provide enough room to comfortably sew around. Now, you need to find the center point of the piece. Two lines will take care of that!


Next, measure 1.25″ out from that center point in each direction and make a mark. (Don’t worry, you cannot measure the wrong way because the other direction is only an inch wide from the center!) Punch holes through those markings.
Place the pattern piece on top of your full pattern and bask in amazement at the accuracy of your measurements! Wow, you are awesome!!

4. Time to put your new pattern piece to work! Now, since this piece will be on the inside of your pocket. You can use pretty much whatever material you see fit. I used the same suedecloth as the inner but even absorbent material would work!
Trace the pattern piece and cut out two layers of fabric. Leave a bit around the outside of the traced line.

Apply one socket and one stud on the snap placement markings.

Take it to the machine and sew ON the line that you traced

Trim the excess fabric to even up your seam allowance.

OK, set this piece aside for now.
5. Inner cutting time! Trace around your pattern on the wrong side of your fabric and stop your tracing lines when they are at the appropriate “pocket” line on your pattern. (side note: remember which line is which or you will wind up with pattern pieces that don’t overlap) Also, make sure to mark the snap placement for the rise snaps as well. Feel free to leave off the soaker snap placement though…you will not be using them.
Use your wonderful algebraic skills to draw a line between these two points.

Repeat for the front panel piece as well.
6. Placing the rise snaps! OK, at this point you have what looks like standard inner layers for a sham pocket diaper and a funky little piece of fabric with two snaps attached. Those snaps need to be part of this diaper!
Pull out your little pattern piece and place it over the markings on the wrong side of your inner. Once you have the piece lined up so that you can see the markings through the holes, trace around it.

This will leave you with a layer that looks like this:

Pin your snapped piece with cap sides down to the WRONG side of the inner (If you pin it to the right side… you will kick yourself later).

Sew around the piece on the same line as before (I change my bobbin thread to coordinate with the inner, but that is not necessary).

Flip the inner over and look at the right side! YAY! Just a 2″x4″ square and no snaps against the baby!

7. Hemming and assembly! I do not hem the part of the inner that will be hidden when the diaper is complete. I find that by leaving it without a hem it cuts down on bulk, strain on the machine and it lays flatter to boot. If you are using a fabric that will fray, you will want to at least serge the bottom of that piece. For the front panel piece you will need a hem.
Measure 1/4″ from the bottom of the piece and mark two dots.

Draw a line at that 1/4″ level.

Fold the fabric along that line and pin with wrong sides facing each other. (Yes, for those of you who know me, I am now a reformed pinner. LOL)

Sew hem down. I again left the bobbin thread the color as the inner.

Grab your outer fabric and place the front panel piece right sides together on top of it.

Lay the back panel piece right side down on top of both of your other layers.

Pin everything together.

Sew All the way around. Remember, you don’t have to leave an opening because you can turn through the pocket! Seriously, that is my favorite part! Apply the elastic, topstitching, snaps, etc. according to the t&t version of the pattern.
8. YOU ARE DONE! You now have a one sized pocket diaper. The weight and size range will vary a bit depending on what type of fabrics you used, but it is nice to have the ease of use of a pocket combined with the convenience of a one sized diaper!
The rise is so simple to adjust. You can either do it with the diaper right side out simply by feeling around and snapping the snaps together, or you can turn it inside out and snap them together that way.


**Disclaimer: designs used on this diaper were hand digitized for personal use only by a member of a message board I frequent. This diaper was a shower gift for a friend and was not sold for profit!**
Now, get out there and make some LOS pocket diapers! You know you want to 😉
Oldies are Goodies, But Freebies are Oh So Sweet!
November 20 at 12am | Posted in Freebies, Little Comet Tails, Sewing | 27 CommentsIf you’ve been watching me for awhile (stalker) you’ve seen the tighty whitey hipsters before 😉
Debuting here in March of ’06:

It’s been a bit tweaked since then, but the overall look is the same 😉 (BTW, the star goes on the booty) Well, if you have seen them and thought; “Wow, I really want to make my own!” then here’s your chance.

There is just one size on here, just set your printer to the % associated with the size you’d like and tape printed edge to edge 😉 (if you are a hook and loop gal, use 2″ on the larger sizes and 1.5″ on sizes small down, just cut to the width, not the height) Should work out just peachy.
http://littlecomettails.kingstondesign.com/tightywhiteyhipsters.pdf
And, since a picture is worth a thousand words, here is your 23,000 word professional guide 😉
Tighty Whitey Hipsters Instructions
The NSFW Unhidden!
October 23 at 6pm | Posted in Freebies, Little Comet Tails | 7 CommentsWhen I updated my website I forgot to put up links to the Not So Flat Wrap! There was quite a stir I caused! lmbo Sorry about that!
Without further ado…
Not So Flat Wrap (500 KB PDF)
Not So Flat Wrap Detailed Instructions
Side Snapping Option!
September 26 at 2pm | Posted in Freebies | Leave a commentIn my original directions I left it up to you all where you’d like the snaps to be on the side snapping version of the Little Starter Cloth Diaper Pattern. I feel that one of the main advantage of ss (side snapping) diapers is that they can be tailored to fit your baby. If you have a larged thighed, skinny waisted baby chances are you would stagger your snap postition in an arrangement something like this:

Inversely, if your baby needs more room in the waist, you’d stagger the other way.

If you are making the diaper for a newborn, gift, or “average” baby, you can use my suggested snap placement. Available to download here! Send me pictures 🙂
Add-on for the Sprightly Soaker Pattern
May 29 at 3pm | Posted in Freebies, Little Comet Tails | 3 CommentsYou can now sew in an extra layer to the Sprightly Soaker & Underwear Pattern for better protection against wicking! The download is for all sizes and works great even overnight! I’ve even had a tester make training undies with this 🙂
http://www.kingstondesign.com/optionalsoaker.pdf
XXS Little Starter Free Download!
March 6 at 9am | Posted in Freebies, Little Comet Tails | 14 CommentsMy friend recently gave birth to a 6lb and change baby and her Little Starter Cloth Diaper Pattern nb diapers were huge! I came up with an XXS pattern, just for her 🙂
http://www.samanthaliz.com/lct_littlestarter_xxs.pdf


Flickr


Blog at WordPress.com.
Entries and comments feeds.
